
Congratulations, you’ve found a fossil! What are the next steps to ensure it lasts a long time in your collection? How can you make sure it looks the best for display?
Before starting, it’s important to have a safe and well-equipped workspace. Once you have that, gather the necessary tools for cleaning and preparing your fossils. Lastly, consider how you would like to showcase your collection.
Making sure you have the proper tools and setup can make all the difference in guaranteeing your new addition looks nice and lasts a long time in your collection. You wouldn’t want to ruin a delicate piece of history through simple negligence.
If you haven’t found any fossils yet, we have a fossil hunting guide that may help you break into this hobby. Once you’re ready, let’s get to cleaning!
Fossil Cleaning Workspace
Beyond having a well-lit space, the most important aspect of any fossil prep area is ventilation. Cleaning and preparing fossils usually involves a lot of dust, sand, or ash which can be dangerous. This is true, especially the more fine-grained the debris is.
The easiest solution for most hobbyists is to work outside. This can involve a portable setup you can store inside when not in use, working in a garage space with open doors, or more permanent outdoor fixtures that can be protected from the elements.
It all depends on how much prep work you plan on doing and your budget. It does not have to be expensive or intricate for basic applications.
For most fossils, something as simple as a fan or nearby exhaust vent paired with a mask and some protective eyewear is more than enough. This can be used inside or out and is a great way to get started.
In any indoor workspace, a nice way to make cleanup easy is to do all prep work inside a container. Any plastic tub or cardboard box will work and will be somewhat portable. Next, you’ll need some tools.
Tools For Fossil Preparation
The types of tools needed to prep a fossil mostly depend on the rock containing the fossil. For anything in loosely consolidated sand or mud, water, and dental instruments will usually do the trick.
Spoons, butter knives, or other dull blades can scoop away large amounts of the matrix, the rock surrounding your fossil. Smaller tools like dental picks can then be used for the detailed work around the fossil itself.
I didn’t link to any of these, as you can probably find some around your house. Even paleontologists use many simple tools. If you want to clean fossils at home, you’ll use the same gear as the professionals.
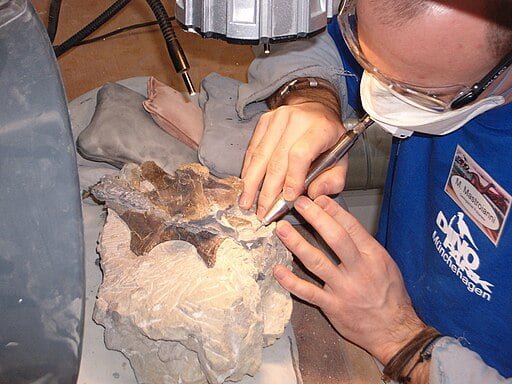
When your fossil is stuck in a rock, it becomes more difficult to prep it gently. In labs, a carving tool called an air scribe is often used for delicate work around the fossil.
![How to prep a fossil crab [entry level scribe compared]](https://jurassicparkterror.com/wp-content/plugins/wp-youtube-lyte/lyteCache.php?origThumbUrl=https%3A%2F%2Fi.ytimg.com%2Fvi%2F5_KqO3L7cKE%2F0.jpg)
An air scribe is essentially a tiny, handheld jackhammer that breaks off chips of rock. While this is something you can purchase for yourself, any simple rotary tool like a Dremel kit can do similar work and is more accessible to purchase.
While they’re still pricy, they are worth the investment for serious fossil collectors who wish to get into cleaning fossils. I’ve linked to a complete kit below, but you can buy pieces separately if you’d like.

A microscope can be a rather significant investment for someone cleaning fossils as a hobby, but never fear! A strong magnifying glass or jeweler’s lenses are often more than enough for the level of detail needed here.
Just remember that your hands will be busy working on the fossil, so a magnifying glass that can be propped up or on a stand is preferable. Of course, you can’t forget the classic paleontology tool: the paintbrush.
It’s always a good idea to have a few paintbrushes of various sizes nearby to both clear your workspace and brush debris off your fossil as you work on it. Sometimes you can use vinegar or hydrogen peroxide to gently remove sediment with a toothbrush.
Should you use chemicals to clean fossils? Well, it largely depends on what you’re cleaning, as an acid like vinegar may be pretty harsh.
If you’d like a detailed guide on using vinegar to clean fossils, check out this article by Sciencing. This thread about using hydrogen peroxide on thefossilforum.com is also pretty useful.
Now that your tools are on hand, we can begin the preparation phase. Let’s get started.
Fossil Preparation Techniques
When it comes to prep work, always assume that the fossils are more fragile than they are! They’re not replaceable and repair work can be tedious.
It’s better to be patient and go slow rather than add unnecessary time later with repair work. Better safe than sorry.
Protective eyewear is a must for most prep work, especially anything involving chips and chunks of rock flying around. I’ve linked to a quality pair of safety goggles below, but many options work well.

In the field of paleontology, there are two main approaches to repair work: minimally invasive or permanent fixation. Most collections and research specimens are prepared and repaired in a minimally invasive way to ensure the integrity of the fossil.
Things set up for display and in personal collections are often repaired more permanently. Both ways are entirely valid and depend only on your preference and what you want from your collection.
Repair work for fossils is almost always consolidation and gluing. There are several things you can use for this.
Paraloid (formerly acryloid) is great to invest in since it can be mixed at different ratios to make both a consolidant and a glue.
Consolidants are thin substances applied to something to fill in the pores and solidify it. These help to ensure the fossils won’t deteriorate over time.
If your fossil is something that is going to be handled or moved a lot in your collection, definitely consider consolidating them with something like Paraloid! It is typically sold in pellet or powder form and is mixed with a solvent, usually acetone, to form a liquid that can be applied to your fossil.
The solvent will eventually evaporate, leaving behind the Paraloid in the pores and strengthening the fossil. This will leave a shiny, plastic surface wherever it’s applied. Don’t worry, a little acetone will wipe off any Paraloid from the surface.
It can also be mixed at a different ratio to form something thicker that can be used as glue. For repairing broken specimens, this is perfect!
Another option is cyanoacrylate glues or superglues. These work great, especially for small and detailed repairs. I have linked to some highly recommended ones below. These glues come in various bottle sizes and thickness levels, but I’d start with thin.
 Super Glue by STARBOND - 16 OZ Complete Refill KIT (453-gram) - Super Fast Thin 2 CPS Viscosity Adhesive for Woodturning, CA Finish, Woodworking, Hobby Models, Inlay")
White glues are always an option, though they yellow, peel, and degrade over time. This isn’t recommended for anything you want to look good for display.
If you use cyanoacrylate glue to repair your fossil, it will set very quickly. This can be a good thing, but if you choose a different glue, it can take hours to set fully.
In this case, creating a sand bath is a good way to make sure it doesn’t set incorrectly if you’re not able to sit and hold the pieces in place while it sets. Fill any small container big enough to comfortably hold your fossil with sand and simply prop the glued pieces up in the proper position.
This will help make sure the pieces don’t budge while the glue sets and if any sand gets stuck to the glue as it dries. You can always use your tools to remove it later. Next, we must discuss proper storage for fossils.
How to Store Fossils Properly
There are several options for storing your fossils safely, but almost every personal collection will include at least a few fossils on display. There are some extra steps to take with displaying fossils to ensure their safety and longevity.

For basic fossil storage, dedicating shelves or drawers to your collection is the best way to start. When storing fossils, always take their size, weight, and fragility into consideration. Don’t put that delicate tooth you spent hours gluing back together underneath a large pyritized ammonite!
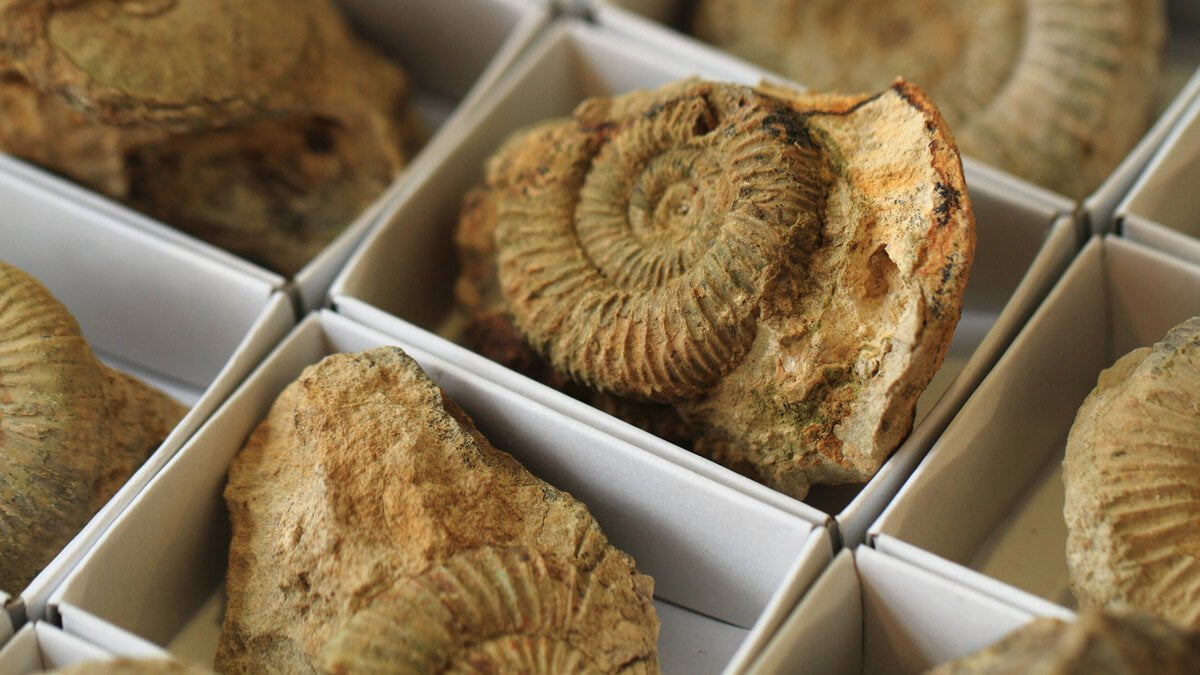
The easiest way to safely store fossils is in boxes. These can be padded with shipping material or cloth to make sure the fossil doesn’t roll around, especially if kept in a drawer that will be opened and closed.
Boxes can be stacked to some degree so that you get full use out of your storage space. Jewelry/beading boxes are a wonderful storage option for small and delicate fossils that may get lost in large drawers or shelves.
I found this storage case on Amazon that has foam underneath and a glass display to beautifully display small items. It’s very well built and makes a stylish display piece.

Remember, anything on display should be kept out of reach of children and pets, both for their safety and that of the fossil. How can you secure fossils left out on display?
A handy tool for anything left out in the open is museum wax. It secures fossils well, especially those that may not be very heavy, while not being permanent. This is my preferred method. You may also consider locking cases that prevent unwanted entry.
I liked this article from the Fossil and Crystal Shop Blog which has some beautiful setup ideas. You can also do an image search online to get a quick glimpse of some setups others have tried.
How to Clean Fossils at Home Like a Paleontologist
Now you should have a good grasp on basic cleaning techniques for protecting delicate fossils. As you can see, it’s not really that difficult.
Most tools can be obtained at a low cost online or from a local hardware store. You can opt for some specialized tools such as a Dremel if you’d like to get into advanced techniques, but you don’t have to ever do that.
You can use cheap jewelry boxes or elegant display cases. These are your fossils, so run your museum as you’d like and have fun!
The most important thing is to decide how you want to prepare and display your fossils. If you decide you’d like to expand your skills, there are plenty of videos to watch to learn more about how paleontologists work on fossils. If you’re interested in paleontology careers, we have an article that covers what you need to do.
I hope this article helped you to perfect your fossil collection. We’d appreciate it if you’d share this post with your friends.
If you have any further questions, leave a comment and I’ll elaborate further. I’d love to see what interesting fossils you’ve collected!
We have several fish fossils from kemmer Wyoming the rock is very powdery and messy can we spray them with something or apply something that is permanent like you’d lacquer a piece of wood which I think would look good
Some simple ways to seal delicate fossils like fish or plants with materials at home are using any cyanoacrylate glue (‘super glues’) or by mixing white glue with water to make a diluted mixture. These can be brushed onto the fossil or, for the white glue mixture, the fossils can be carefully dipped in the mixture.
Paraloid is always the best option for sealing delicate fossils without damaging them, but these methods are more accessible and work well, too! Always avoid applying shellacs, varnishes, or mineral oils directly to the fossils. They can, however, be applied to the rock surrounding the fossils if you would like.
Let me know if you have additional questions.